Showing posts with label continuous-integration. Show all posts

Thursday, July 29, 2010

Migrating a Hudson instance

Quick post to hopefully help others with an error I got when moving our Hudson instance from Windows to its new home on a Linux server.

The basic migration is super easy - just zip up the Hudson home directory (default on Windows XP is C:\Documents and Settings\[username running Hudson]\.hudson) and restore it onto the new server. However, when you start your new Hudson instance you may see one of both of the following errors in the console output:

SEVERE: Timer task hudson.model.LoadStatistics$LoadStatisticsUpdater@74e8f8c5 failed
java.lang.AssertionError: class hudson.node_monitors.DiskSpaceMonitor is missing its descriptor
at hudson.model.Hudson.getDescriptorOrDie(Hudson.java:937)
at hudson.node_monitors.NodeMonitor.getDescriptor(NodeMonitor.java:83)
at hudson.node_monitors.NodeMonitor.getDescriptor(NodeMonitor.java:67)
at hudson.util.DescribableList.get(DescribableList.java:104)
at hudson.model.ComputerSet.(ComputerSet.java:356)
at hudson.model.LoadStatistics$LoadStatisticsUpdater.doRun(LoadStatistics.java:214)
at hudson.triggers.SafeTimerTask.run(SafeTimerTask.java:54)
at java.util.TimerThread.mainLoop(Timer.java:512)
at java.util.TimerThread.run(Timer.java:462)

Jul 29, 2010 1:47:39 PM hudson.triggers.SafeTimerTask run
SEVERE: Timer task hudson.model.LoadStatistics$LoadStatisticsUpdater@74e8f8c5 failed
java.lang.NoClassDefFoundError
at hudson.model.LoadStatistics$LoadStatisticsUpdater.doRun(LoadStatistics.java:214)
at hudson.triggers.SafeTimerTask.run(SafeTimerTask.java:54)
at java.util.TimerThread.mainLoop(Timer.java:512)
at java.util.TimerThread.run(Timer.java:462)

The fix is easy - just stop Hudson, delete the file nodeMonitors.xml in the main Hudson directory, and restart Hudson. It looks as if that file contains data that's specific to the old system; Hudson will recreate the file after restart.

Wednesday, July 7, 2010

Hudson as a CVS Watcher on Windows


I'm currently consulting at a large corporate outfit in Silicon Valley - sometimes it's a bit like going back in time to the mid-90s. They're using CVS and most developers don't have much visibility into the repository, so one of the first things I set up was an email to interested people every time somebody checks into CVS.

Hudson was the perfect choice for this since I want to move on to continuous build, test and deployment eventually, but it doesn't hurt to start with a baby step. The surprise on the faces of people who haven't come across Hudson or CI tools in general is something to behold !

I had to run Hudson on a Windows machine, which came with its own little set of issues, so here's a step by step for future reference.
  1. Install a Windows CVS command line client. This proved a little hard to track down as the main cvsnt.org site doesn't seem to have any free downloads any more. I eventually found the CVSNT client bundled with the CvsGui project at http://www.wincvs.org/ - it comes with a separate installer, cvsnt_steup.exe, that lets you install just the client utilities.
  2. Install and run Hudson - just get the WAR file from the download page, save it locally and run "java -jar hudson.war"
  3. Set up Hudson as a Windows service - in typical easy-to-use Hudson fashion, you do this from within Hudson itself by going to the "Manage Hudson" page and selecting "Install as Windows service".
  4. Make sure that the Hudson service will run as a user that's already set up to access the CVS repository - for example, if your repository access is via extssh, you'll need to make sure that the user already has the SSH host connection info saved locally, so that you don't get prompts about saving the connection info when Hudson tries to do a CVS update. On Windows XP (yep, my corporate paymaster is still on XP), right-click My Computer in the Start menu, click Manage, then Services under Services and Applications. Right click the Hudson service, select Properties, then enter the user name and Windows password in the Log On tab.
  5. Restart your machine - I found that this was the only reliable way to get Hudson to come back up after making changes in steps 3 and 4.
You should now be good to go and set up your Hudson jobs to poll the CVS repository and report any changes via email; Hudson should be running at http://localhost:8080 by default.

For extra email configurability I used the email-ext plugin; this lets you send email for all successful builds (not just failures and fixes like the default Hudson behaviour) and include all kinds of info in the email body, such as a list of file changes in configurable format.

More to follow as I set up the build and test stuff; we have a client written in Adobe flex talking to a SOAP API with Tibco on the back end, so there should be some, ahem, interesting challenges there ....

Friday, February 19, 2010

Build, Please, Mr. Hudson

One of the absolute must-have tools for any development team these day is a continuous integration (CI) system. Having all your team's code changes built and tested automatically as soon as they're checked into source control is a huge time saver and confidence builder; I shudder when I think of the old days when even small development teams needed one or more full-time build engineers maintaining a build process that took all night to run and often didn't run any tests.

Having got very familiar in previous jobs with CruiseControl, the still-sprightly granddaddy of CI tools, I've been having a bit of a love-hate relationship with Hudson, which my current team uses and which seems to be coming up as the standard for CI these days, especially on Java projects. Lately I've been feeling the love a lot more though, for two particular reasons that I'll go into more detail on here.

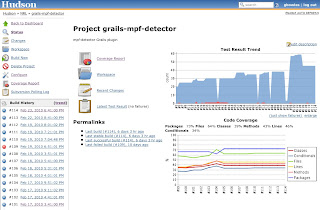
The first one is how easy it is to set up Hudson to build, test and report on Grails projects, which we're using as our standard for web app development these days. There's a nice post here that lays out all the details, but suffice to say that, thanks to Grails' and Hudsons' plugin architectures, it's very straightforward to set up a Hudson build that builds a Grails app, runs all its tests (including functional tests that run the complete app in its web container), collects code coverage statistics for the test run, and displays both the current test and coverage results plus trend graphs in the Hudson UI. Seeing the number of passing tests and the code coverage going up over time is a great motivator for developers !


The second thing that increased my admiration for Hudson is the ease of setting up a "slave" build server. You may want to do this to distribute multiple build jobs in order to maximize your resources, or to build on a specific platform. In my case I had the latter requirement; our Hudson server runs on CentOS but I needed to build a runtime distribution on SuSE 10.2.

The Hudson documentation on setting up a slave server isn't too great (the so-called step by step guide leads you to a blank page !), so I thought I'd lay out the steps I used here.
  1. Go to the Manage Hudson link in your Hudson dashboard and click Manage Nodes.
  2. Create a new node, name it and select the "Dumb Node" option (this actually seemed to be the only available option in my version of Hudson).
  3. Before you fill out the node details, verify a couple of things on the slave server. You need a directory that's writable by the user that will be running the Hudson slave process (this directory is where Hudson will check out the source code and run the build), and you need to copy the master Hudson server's public SSH key into ~/.ssh/authorized_keys for the Hudson slave process user on the slave server, so that Hudson can log in via SSH without a password.
  4. Fill out the node details. Specify the directory you created in step 3 for "remote FS root".
  5. Select "Launch agent via execution of command on the Master" for the launch method, and enter the command: ssh [Hudson slave user]@[slave host] "java -jar [remote FS root]/slave.jar"
  6. Set up the node properties (environment variables and tool locations) as needed. THIS IS IMPORTANT - because Hudson slaves have to be launched from the master, whereafter they're controlled via stdin and stdout on the slave process, you can't set environment variables like JAVA_HOME and ANT_HOME on the slave server via the slave user's environment. These variables need to be set up in the Hudson master's configuration, either via key-value pairs in the Environment settings for the node or, if you want to share values across nodes, in the Tool Locations settings (which are stored centrally and can also be maintained via Manage Hudson / System Settings).
  7. Save your new node. If all went well you should see it start up in the Manage Nodes page; if not, you should be able to figure out what went wrong from the Hudson log.
Once your slave node is set up, you can specify that it should be used for a given build job by checking "Tie this project to a node" and selecting the node in the job configuration. The slave builds will be controlled, logged and reported in the Hudson master UI just as if they were running on the master node - very nice !

UPDATE: this blog post by RMP adds a few details to my steps and also has a Linux startup script for the Hudson slave agent.

The slave build I set up is being used to build a set of C libraries, run tests on them and package them into a Linux RPM. This is a bit more tricky than building a Java based application, but there are some nice tricks we came up with to streamline the process into Hudson that I'll plan to blog on in a future post.