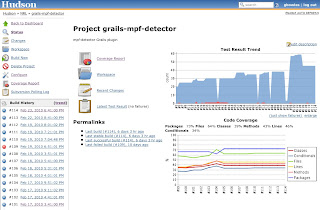
Having got very familiar in previous jobs with CruiseControl, the still-sprightly granddaddy of CI tools, I've been having a bit of a love-hate relationship with Hudson, which my current team uses and which seems to be coming up as the standard for CI these days, especially on Java projects. Lately I've been feeling the love a lot more though, for two particular reasons that I'll go into more detail on here.
The first one is how easy it is to set up Hudson to build, test and report on Grails projects, which we're using as our standard for web app development these days. There's a nice post here that lays out all the details, but suffice to say that, thanks to Grails' and Hudsons' plugin architectures, it's very straightforward to set up a Hudson build that builds a Grails app, runs all its tests (including functional tests that run the complete app in its web container), collects code coverage statistics for the test run, and displays both the current test and coverage results plus trend graphs in the Hudson UI. Seeing the number of passing tests and the code coverage going up over time is a great motivator for developers !

The second thing that increased my admiration for Hudson is the ease of setting up a "slave" build server. You may want to do this to distribute multiple build jobs in order to maximize your resources, or to build on a specific platform. In my case I had the latter requirement; our Hudson server runs on CentOS but I needed to build a runtime distribution on SuSE 10.2.
The Hudson documentation on setting up a slave server isn't too great (the so-called step by step guide leads you to a blank page !), so I thought I'd lay out the steps I used here.
- Go to the Manage Hudson link in your Hudson dashboard and click Manage Nodes.
- Create a new node, name it and select the "Dumb Node" option (this actually seemed to be the only available option in my version of Hudson).
- Before you fill out the node details, verify a couple of things on the slave server. You need a directory that's writable by the user that will be running the Hudson slave process (this directory is where Hudson will check out the source code and run the build), and you need to copy the master Hudson server's public SSH key into ~/.ssh/authorized_keys for the Hudson slave process user on the slave server, so that Hudson can log in via SSH without a password.
- Fill out the node details. Specify the directory you created in step 3 for "remote FS root".
- Select "Launch agent via execution of command on the Master" for the launch method, and enter the command: ssh [Hudson slave user]@[slave host] "java -jar [remote FS root]/slave.jar"
- Set up the node properties (environment variables and tool locations) as needed. THIS IS IMPORTANT - because Hudson slaves have to be launched from the master, whereafter they're controlled via stdin and stdout on the slave process, you can't set environment variables like JAVA_HOME and ANT_HOME on the slave server via the slave user's environment. These variables need to be set up in the Hudson master's configuration, either via key-value pairs in the Environment settings for the node or, if you want to share values across nodes, in the Tool Locations settings (which are stored centrally and can also be maintained via Manage Hudson / System Settings).
- Save your new node. If all went well you should see it start up in the Manage Nodes page; if not, you should be able to figure out what went wrong from the Hudson log.
UPDATE: this blog post by RMP adds a few details to my steps and also has a Linux startup script for the Hudson slave agent.
The slave build I set up is being used to build a set of C libraries, run tests on them and package them into a Linux RPM. This is a bit more tricky than building a Java based application, but there are some nice tricks we came up with to streamline the process into Hudson that I'll plan to blog on in a future post.

